

In previous part I detailed what are RDS 2016 deployment types, news in RDS 2016 and what are core components. In this guide we will focus on Quick Deployment (All-In-One)
Let’s get started.
Install RDS Roles
OBS!!! Avoid adding RDS roles through Roles and Features Wizard if you are not a Powershell fan. You will need to configure RDS using Powershell.

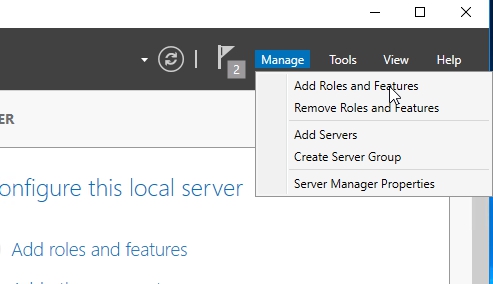
Open Server Manager and click Manage -> Add Roles and Features
In the wizard on the Before you begin page click on next.
On Select Installation Type page, select Remote Desktop Services Installation, Click Next

On Select Deployment Type page, select Quick Start and click next

On Select Deployment Scenario page, Select Session-Based Desktop Deploymentand click next

Since we did the Quick Start selection the Connection Broker, Web Access and Session Host roles will be installed on the single server. Click Next

On Confirmation page, check the box Restart the destination server automatically if required and click Deploy

When you click Deploy progress window will show up. After system restart check that all services configures successful and click Close

That’s it. We can access Remote Desktop Services through Server Manager if we click on Remote Desktop Service link in the left pane.

When you click on it, you will find your self in front of “RDS Manager”.
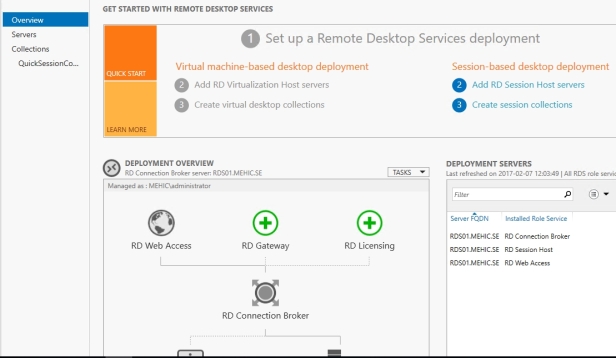
When you choose Quick Deployment type, Collection (QuickSessionCollection) and Remote App Programs are already configured.
Collections separate out RD Sessions Hosts into separate farms and allow admins to organize resources. (I will talk more about Collections and Collection Properties in my Purpose of RD Collections post).

As you can see the deployment is missing a RD Gateway server and a RD Licensing server.
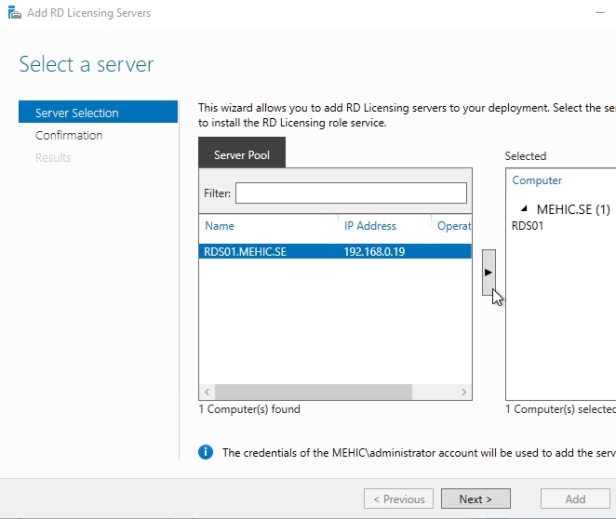
Click the Add RD Licensing server green button.

Select a server, Next
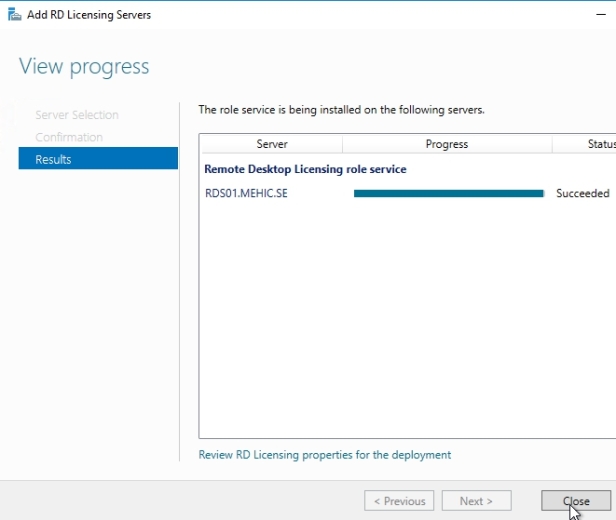
Confirm selections and click add. Wait until the role service is deployed and click Close.
Next, we need to add RD Gateway. Click the Add RD Gateway server green button.

Select a server, Next

When we go through the wizard it’s gonna create a self-signed SSL certificate. I will replace that certificate with Trusted one a little bit later. On SSL Certificate Namepage, I will type in Fully Qualified Domain Name of my RDS server rds01.mehic.se

Hit Next and Add. Wait until the role service is deployed and click on the Configure Certificate to review Certificate Options

(OBS!!! I will talk more about Deployment Properties in Exploring Deployment Properties series)

Notice that the certificate level currently has a status of Not Configured. The RD Gateway certificate is used for Client to gateway communication and needs to be trusted by the clients. Either install the self-signed certificate on all clients, or use a certificate for which the complete certificate chain is already trusted by all clients. As it said in the wizard, the external FQDN should be on the certificate.
Before we create new certificate, we need to configure DNS so that external users can resolve the name of the RD Gateway to the right IP address. You will configure it on your external DNS (hosted dns or DNS out on your ISP) somebody that we do not have the control over but that is accessible from the internet.
In this case my “external DNS” (ROUTER -machine on my external network) will handle DNS for the external network.
If I try to ping my gateway from external Windows 10 machine the ping will fail.

Everything works internally

Open DNS Manager and browse to Forward Lookup Zones. Right-Click on Forward Lookup Zones and select New Zone

On Welcome to the New Zone Wizard page click next. On Zone Type page accept the defaults and click next.
On Zone Name page, type in your zone name, In my case mehic.se and click next

On Zone File, Dynamic Update page accept the defaults and click Finish
Once finish, right-click on the new zone and select New Host (A or AAAA)

In real life you would type in the external IP address of your NAT router or the firewall, public IP that is closest to the gateway. In my case I am not running NAT and I am not running firewalls so I will put in its internal IP

I will also add my CA IP address.

Now if I try to ping from my “External Machine” ping will work.

Let’s try to connect to RDCB with RDP. Just open Run (Windows Button + R) and type in mstsc. Type in RDCB name and click on Advanced Tab

Advanced –> Settings and specify RD Gateway and click OK and Connect.

Windows Security will popup. Type in credentials and hit OK and you will run into this error.

We receive this error message because we didn’t configure certificate which is our second prerequisite.
In real life you would purchase this certificate from a public CA (GoDaddy,VeriSign etc.). This certificate needs to contain the FQDN you will use as the RD Web Access URL (mine is rds01.mehic.se). It needs to be in .pfx format and you need to have the private key in it. In my case I will use my private CA. (If you are not familiar or if you do not have private CA, please take a look on my Mastering Windows Server 2016 series to learn how to install Certificate Authority)
Open Server Manager –> Tools –> Certification Authority

In CA snap-in, right click on Certificate Template and select Manage

This opens up the certificate template snap-in. What we need to do is to pick one of these templates and copy it so that we can customize it for our purposes. With remote Desktops most certificates that we need are for SSL. Right-Click on Web Server template and select Duplicate Template

New Template Window will pop-up. First thing I am going to do is to change certificate name to MEHIC SSL on the General Tab.

Next click on Request Handling Tab and check Allow private key to be exported.

There is a number of things we can do but the most important thing is permission. So click on Security Tab and give Authenticated Users right to Enroll and Autoenroll. (OBS!!! In real life you may want to lock that certificate down to particular people but in this case it is not important.) I will also going to add in domain computers and give them permission to read, enroll and autoenroll. Click OK when it is done.


Now we need to take that template and Publish it to the CA. To do that, right-click on Certificate Templates –> New –> Certificate Template to Issue

Select our newly created certificate and click OK. When you click OK you will be able to see it in the list of the certificates that have been published to the CA.


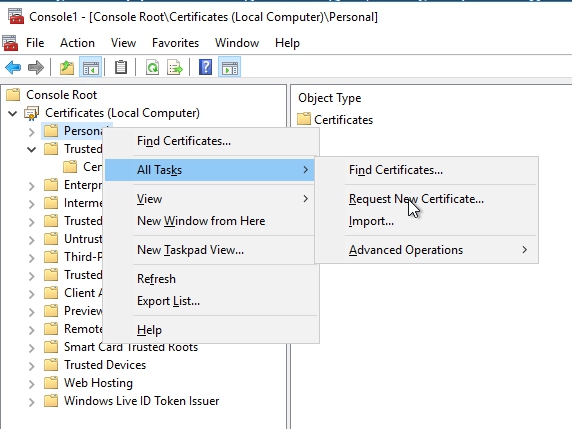
The last step is to enroll certificate. Switch over to RDS01 and open up MMC (Windows button + R and type in mmc) Right-Click on Personal –> All Tasks –> Request New Certificate
On Before you begin and Select Certificate Enrollment Policy page, click Next. On Request Certificate page, select MEHIC SSL and click on the link More information is required…. (With an SSL we have to provide other information)

Change the Subject Name Type to Common Name and add the exact name of the server or web site that you are using. First I will add the single lable name rds01 and than the FQDN rds01.mehic.se, click OK

It allows me to Enroll, and then you can see that i have succeeded. Click Finish

Now underneath Personal I can go up and click Certificates, and there’s the certificate that I requested. Next we need to export the certificate with private key and configure gateway, rdwa, rdcb to use it.
Right-Click on it –> All Tasks –>Export

Welcome Export Wizard will pop-up. Click Next. Select Yes, Export the private keyand click next

On Export File format click next.

Check Password box and type in the password. Click next

Type in the name and where you want to save it and click next and finish
Now let’s go back to the Deployment Properties and select RD Gateway –> Select Existing certificate

Add certificate and click OK.

Click Apply and you will notice that certificate level has now status of Trusted.

Do the same for the RDWA and RDCB.
Time to test the setup!
Internal
Browse to the https://”Your RDWA server name”/rdweb. If everything is good, we will not receive certificate error message. RD Gateway will also work.

External

Cheers,

![Microsoft Active Directory Certificate Services [AD CS] Installation](https://hamidsadeghpour.net/wp-content/uploads/2019/03/CA-Srv-768x432.jpg)